Turmeric-braised halibut steaks with garlic

If you cannot find halibut, you can substitute cod, tilapia, or even salmon or artic char. The aromatic flavor of this dish comes from first searing the fish on both sides and then braising it in the coconut milk infused with a bountiful amount of garlic and turmeric. Serve with steamed jasmine or basmati rice and a simple sauteed or steamed vegetable, such as asparagus, snow peas, or baby bok choy.

YIELD
4 servings

INGREDIENTS:
Four 8-oz halibut steaks
2 1/2 teaspoons fine sea salt
2 tablespoons grapeseed or other neutral oil
1/4 cup/55 g peeled and minced fresh turmeric
12 medium-sized garlic cloves, minced
1 1/2 cups unsweetened coconut milk
4 serrano chiles, stems removed but seeds intact, cut in half lengthwise
1 teaspoon freshly ground black pepper
 
INSTRUCTIONS:
Blot the fish steaks dry with paper towels and place on a large plate. Season both sides of the fish with 1 teaspoon of the salt.
 
Heat oil in a 12-inch frying pan over medium-high heat. Add fish and sear until golden brown on both sides, turning once, about 3 minutes per side. Remove the fish to a plate.
 
Add the tumeric and garlic, and sauté , stirring constantly, until the aromatics are soft but not brown, about 1 minute. Add the coconut milk, chiles, pepper, and remaining 1 1/2 teaspoons salt. Bring to a simmer. Reduce the heat to low and return the fish to the pan. Spoon the sauce over the fish. Cover and cook, spooning the sauce over the fish once or twice, until the fish flakes easily when pierced with a knife, about 8 minutes. Arrange the fish on warm dinner plates, spoon some of the fish over each fillet, and serve immediately.

Coconut granola crunch

You’ll be snacking on this before it ever gets scooped from the baking sheets and packed into the gift bags—it is so addictively good! It’s better than any store-bought granola we’ve ever tasted. It’s a deliciously healthy gift to give, packed with plant-derived omega-3 fatty acids from the canola oil and ground flax seeds, protein-charged with almonds and hazelnuts, and nutrient-rich with the addition of dried fruit. Customize the granola by substituting different nuts, such as walnuts and cashews, and select your own assortment of dried fruit. If giving this granola at Christmastime, the addition of dried cherries or sweetened cranberries makes it look seasonal and festive.

YIELD

Makes 12 cups granola, portioned into four (3-cup) packages

INGREDIENTS:

2/3 cup packed light brown sugar
1/2 cup canola oil
1/2 cup honey
2 teaspoons pure vanilla extract
2 teaspoons kosher or sea salt
2 teaspoons ground cinnamon
1/2 teaspoon freshly ground nutmeg
4 cups rolled oats
1 cup whole unsalted almonds
1 cup whole skinned hazelnuts
1/2 cup ground flax seeds
2 cups large-flake unsweetened coconut
2 cups dried fruit, either golden raisins, dried cherries, sweetened cranberries, chopped dates, apricots, or a favorite combination

Implements

Measuring Cups and Spoons, Large Bowl, Silicone Spatula, Two Large Nonstick Rimmed Baking Sheets, Two Large Cooling Racks

Prep Time: 15 minutes / Bake Time: 35 minutes

INSTRUCTIONS:

  1. Position one rack in the center of the oven and another rack in the lower third of the oven. Preheat the oven to 325°F.
  2. In a large bowl, combine the sugar, oil, honey, vanilla extract, salt, cinnamon, and nutmeg. Stir until combined; however, the oil will not blend into the paste and that’s okay. Add the oats to the mixture and use your hands to massage the ingredients together. Gently crush some of the oats with your fingers.
  3. Divide the oat mixture between 2 large nonstick, rimmed baking sheets and spread the small clumps of oats evenly with a silicon spatula. Bake for 10 minutes, then remove the pans from the oven. Sprinkle 1/2 cup of almonds over each pan of oats and stir to combine. Return the pans to the oven, switching the pans between the racks, and bake for 5 minutes more.
  4. Remove the pans from the oven and divide the hazelnuts and flax seeds equally between the pans, stir. Return the pans to the oven, rotating them between the racks, and bake for 10 minutes longer.
  5. Remove the pans from the oven and divide the coconut evenly between the pans, stirring to mix. Return the pans to the oven, switching the pans one last time, and continue to bake until the coconut is a light golden brown, 5 to 10 minutes longer.
  6. Remove the granola from the oven, set on wire racks, and let cool on the pans. (Don’t worry if the granola doesn’t feel crisp; it will dry out and crisp up as it cools.) Once cool, stir in the dried fruit, dividing evenly between the pans.

COOKS NOTES

Storing

Store the granola at room temperature in tightly sealed glass jars or cellophane bags for up to 1 month.

Gift-Giving Tips

Tie each glass jar or cellophane bag with raffia or ribbon and attach a gift card.

Gift Card

This homemade Coconut Granola Crunch was made on [give date] and can be enjoyed for up to 1 month, stored at room temperature. Enjoy it for breakfast with cold milk, layered with yogurt and fresh fruit for a breakfast parfait, or sprinkled over frozen yogurt for a healthy dessert.

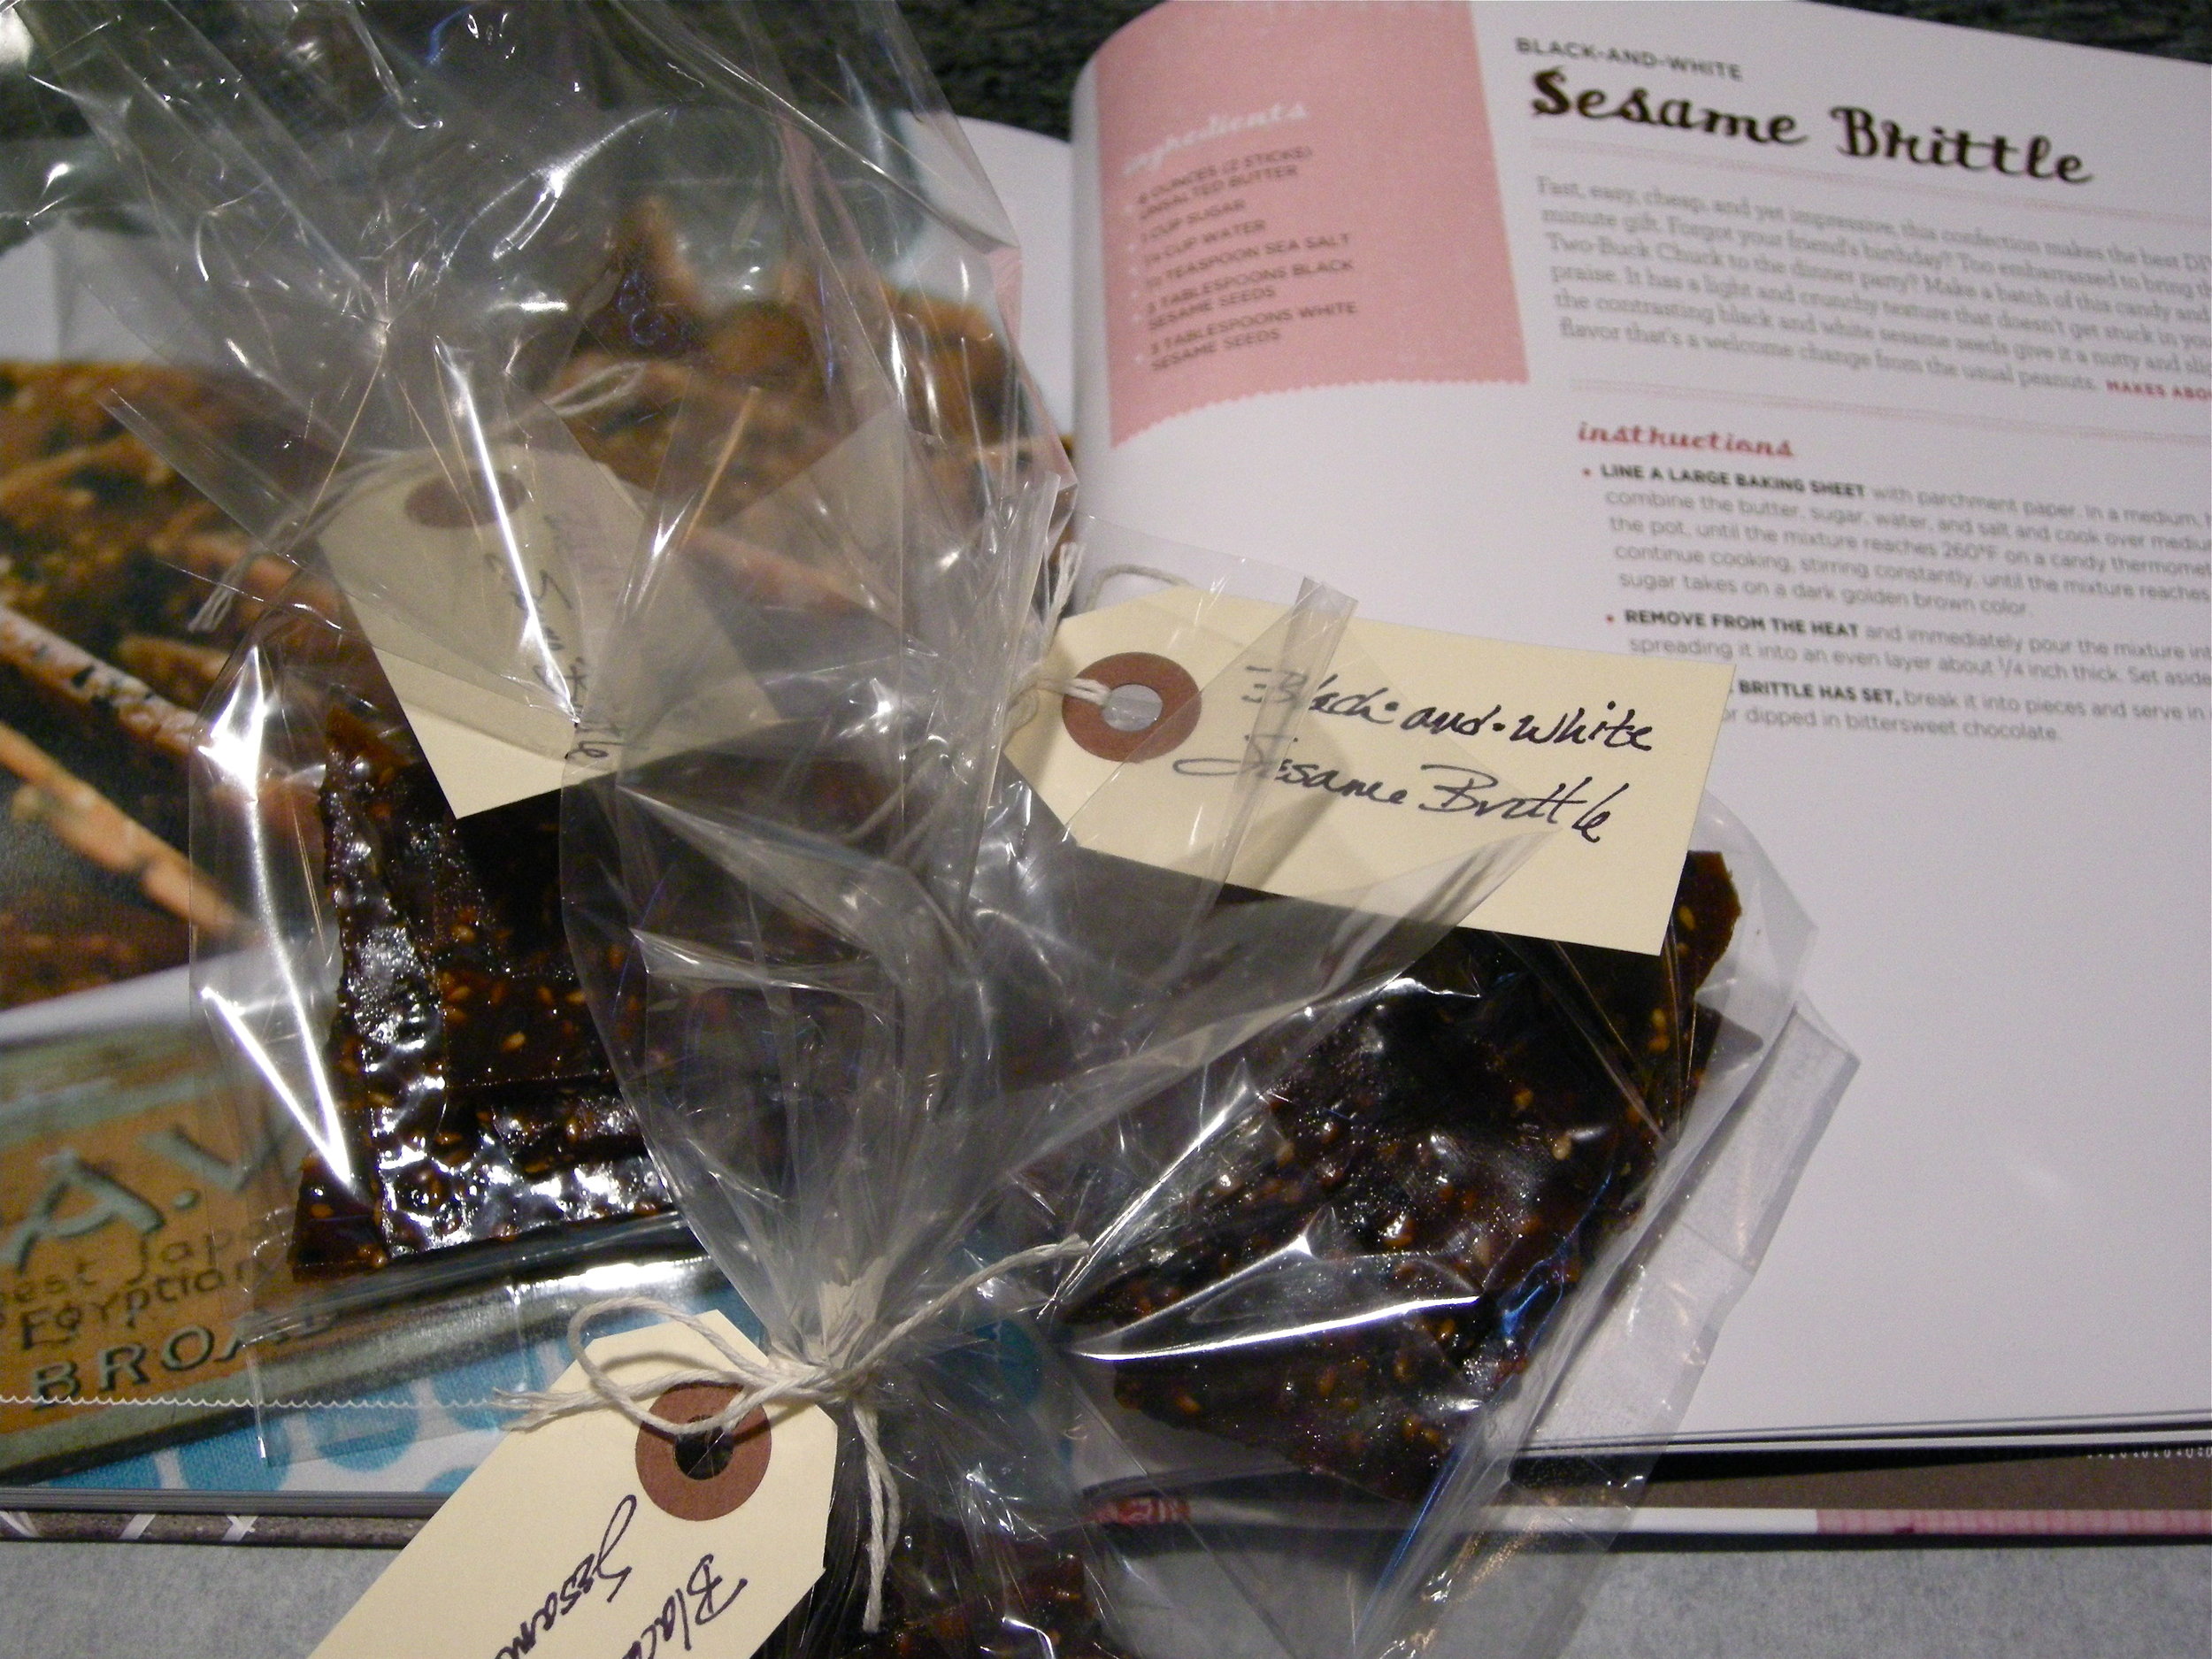
Black-and-white Sesame Brittle

DSCN4261.jpg

A quick-as-can-be, DIY food gift that is impressive and simple to make. Look for black sesame seeds in natural food stores or in Japanese markets. Always store sesame seeds in the freezer (along with all nuts) so the oils do not go rancid.

YIELD

Makes about 1 1/2 pounds

INGREDIENTS:

2 sticks (8 ounces) unsalted butter
1 cup granulated sugar
1/4 cup water
1/2 teaspoon sea salt
3 tablespoons white sesame seeds
3 tablespoons black sesame seeds (available at natural food stores or Japanese markets)

INSTRUCTIONS:

Line a large baking sheet with parchment paper and set aside. Have ready a candy thermometer.

In a medium, heavy-bottomed saucepan combine the butter, sugar, water and salt. Cook over medium-high heat, stirring once or twice until the sugar is dissolved. Boil until the mixture reaches 260°F on a candy thermometer. Add the sesame seeds and continue to cook, stirring constantly, until the mixture reaches 350°F, or until the sugar takes on a dark golden brown color. (I'd suggest pulling the mixture off the heat at 345°F as it continues to cook as you pour it.)

Remove from the heat and immediately pour the mixture into the prepared pan, spreading it into an even layer about 1/4-inch thick. Set aside to cool until firm.

Once the brittle has set, break it into pieces. Package for gift-giving or arrange in a candy dish.


Alder-planked salmon with lemon-vodka-dill marinade

I was getting ready to grill salmon one night, planning to plank the fish and use the Grill EveryDay BBQ Rub on it, when I was inspired by my husband, Greg, who was making us vodka martinis with a twist of lemon. I thought, why not make a lemon-vodka marinade for the salmon? I had dill in the garden, the lemons and vodka were on the counter, and all I needed was some olive oil and seasonings. My suggestion is to make this recipe and mix a martini to go with it! Use any leftover salmon to make a composed salad with grilled vegetables or salad greens.

YIELD

Serves 6 to 8

INGREDIENTS:

1 untreated alder plank, about 15 by 7 by 3/8 inch (see Cook’s Note at bottom of recipe)
1 whole side of salmon (about 3 pounds), skin on and scaled, pin bones removed
1/4 cup extra-virgin olive oil
2 tablespoons vodka
Freshly grated zest of 1 lemon
2 tablespoons fresh lemon juice
2 tablespoons chopped fresh dill
1/2 teaspoon kosher or sea salt
1/2 teaspoon freshly ground pepper

INSTRUCTIONS:

Rinse the alder plank and place it in a pan, sink, or large leakproof plastic bag filled with water. Soak the plank for about 20 minutes. (The plank can be submerged in water and left to soak all day, so plan ahead and soak the plank before you leave for work.)

Prepare a medium fire in a charcoal grill or preheat a gas grill on medium.

In a small bowl, combine the olive oil, vodka, lemon zest, lemon juice, dill, salt, and pepper and mix thoroughly. Place the whole salmon fillet on a large, rimmed baking sheet and pour the marinade evenly over the top. Set aside while the grill heats.

When ready to grill, place the soaked plank on the grill grate directly over the medium fire and cover. After a few minutes, the plank will begin to smoke and crackle. Turn the plank over, re-cover, and “toast” the other side for about 2 minutes. Uncover the grill, transfer the salmon fillet to the plank, and then re-cover the grill. Cook the salmon until it is almost opaque throughout but still very moist when tested with a knife, or an instant-read thermometer inserted in the center registers 125º to 130ºF, 15 to 25 minutes, depending on the thickness of the fillet. (Keep a spray bottle with water nearby in case the plank gets too hot and begins to flame. Extinguish the flame and continue grilling the salmon, adjusting the heat level if necessary.)

Using 2 long spatulas, transfer the salmon to a warmed platter. Use tongs, heatproof gloves, or the spatulas to remove the plank from the heat and set it aside to cool. Cut the salmon into individual servings and serve immediately. Alternatively, for a rustic presentation, leave the salmon on the plank and place the plank on a large heatproof platter.

COOKS NOTES

Purchase untreated alder, cedar, or oak planks from lumberyards or hardware stores and have them cut to size or cut them yourself. Or, for a slightly more expensive approach, buy precut planks specifically for grilling or baking salmon at gourmet cookware stores or online.

A plank can be reused if it isn’t too charred or cracked. Once the plank has cooled, brush it clean with a grill brush, set it upright to dry, and then store it in a brown paper bag. Resoak it before using.

Radish top soup

Until I began working on this book, I did what most cooks do: I bought beautiful radishes with bushy green tops and lopped off and discarded the tops. Never again. Radish tops are both edible and absolutely delicious, fresh or cooked. This recipe, based on a classic French potage, takes full advantage of the radish tops, delivering a brilliant green puréed soup with a silky texture and spicy, bright taste. Serve it in the traditional manner as a starter, or offer soup shots for a fun and unexpected appetizer.

YIELD

Makes about 5 cups; serves 6

INGREDIENTS:

2 tbsp unsalted butter
1 leek, white and light green part only, halved lengthwise and thinly sliced crosswise into half-moons
1 small yellow onion, diced
1 carrot, peeled and diced
11/2 tsp kosher or fine sea salt
1 medium russet potato, 61/2 oz/185 g, peeled and diced
4 cups/960 ml water
11/2 tsp granulated sugar
1/2 tsp freshly ground pepper
5 cups/120 g lightly packed chopped radish tops (from 3 bushy bunches)
5 or 6 radishes, trimmed and cut into matchsticks

INSTRUCTIONS:

In a heavy soup pot, melt the butter over medium-low heat and swirl to coat the pot bottom. Add the leek, onion, carrot, and salt and stir briefly. Cover and cook, stirring once or twice, until the vegetables are very soft but not brown, about 20 minutes. Uncover, add the potato, water, sugar, and pepper, increase the heat to medium-high, and bring to a simmer. Adjust the heat to maintain a simmer, re-cover, and cook, stirring occasionally, until the vegetables are tender when pierced with a fork and soft enough to purée, about 35 minutes. Add the radish tops and stir until the greens are wilted, about 1 minute. Remove from the heat and let the soup cool for about 10 minutes.
Working in batches, process the soup to a smooth purée in a blender or food processor. (At this point, the soup can be cooled, covered, and refrigerated for up to 2 days.) Return the puréed soup to the pot and place over medium-low heat. If the soup is too thick, add a little water to achieve a creamy consistency. Heat until steaming hot, stirring occasionally.
To serve, ladle the soup into warmed bowls. Place a little clump of matchstick-cut radishes in the center of each bowl for garnish. Serve immediately.

Strawberry rhubarb crisp

DSCN42072.jpg

While it might seem obvious when cooking for a crowd to make a big panful of dessert and then scoop out individual portions, I think it is more fun to make individual desserts. For a fruit crisp, I chose to use half-pint, wide-mouth canning jars as my serving dishes. They were economical because I had a large quantity of them on hand. You can bake right in the jars. And, they are pretty darn cute when filled and baked. I made them ahead, warmed the crisps just before serving, and topped each one with a small dollop of ice cream. This recipe fills 15 jars. Double the recipe to serve a big crowd!

YIELD

Makes 15 individual (1-cup) servings

INGREDIENTS:

Topping:
2 cups old-fashioned oats
2 cups all-purpose flour
1 cup finely chopped walnuts, toasted
1 cup packed golden brown sugar
2 1/4 teaspoons ground cinnamon
3/4 cup (1 1/2 sticks) ice-cold unsalted butter, cut into small pieces
Filling:
3 pounds ripe strawberries, trimmed and halved (quartered if large)
4 cups thinly sliced fresh rhubarb
1 1/4 cups granulated sugar
3 tablespoons cornstarch
1 tablespoon pure vanilla extract
1/2 teaspoon fine sea salt
Ice cream, for serving

INSTRUCTIONS:

To make the topping: In a large bowl, combine the oats, flour, walnuts, brown sugar, and cinnamon. Stir until evenly combined. Scatter the butter over top. Using your fingertips, blend the butter into the oats mixture until evenly distributed and the texture is crumbly. Set aside until ready to use. (The topping can be made in advance and frozen in a covered container or freezer-strength lock-top plastic bag until ready to use. In the summer, I like to make a huge quantity of the topping and keep it in the freezer for spur-of-the moment crisp baking.)

To make the filling: In a large bowl, combine the strawberries, rhubarb, sugar, cornstarch, vanilla, and salt. Using a rubber spatula, stir gently until completely blended and all the cornstarch is absorbed.

Heat the oven to 375 degrees F. Spoon the fruit into the individual jars, distributing the fruit evenly. Press down lightly on the fruit to remove any air pockets. Sprinkle the topping over the fruit, dividing it evenly and pressing down lightly. Wipe the rims of the jars if needed. Arrange the jars on a rimmed baking sheet lined with parchment paper. Bake until the topping is nicely browned and the fruit is tender when pierced with the tip of a knife, about 25 to 30 minutes. Serve warm, topped with a scoop of ice cream. Alternatively, set aside for up to 8 hours and warm for 10 minutes just before serving.

Chicken stock or broth

DSCN2736.jpg

Start today to develop a very smart habit: Store necks, tails, wing tips, gizzards, hearts, backs, rib (breast) bones-anything except livers-in a gallon-size lock-top freezer bag in your freezer. When the bag is really full, you have enough chicken parts to make a small pot of homemade stock. Squeeze excess air out of the bag each time you add chicken pieces; this helps to prevent dehydration known as freezer burn. There are several time-honored methods of making chicken stock. Here is our simple approach to a basic stock.


YIELD

Makes 3 to 6 quarts

INGREDIENTS:

Raw chicken parts, preferably wings
1 large onion, wiped clean but not peeled, halved lengthwise through root
2 large carrots, trimmed and cut into 2-inch chunks
2 ribs celery, trimmed and cut into 2-inch chunks
6 to 8 sprigs parsley
1 to 2 bay leaves
4 sprigs fresh thyme
10 whole black peppercorns

INSTRUCTIONS:

Select a heavy 4-quart saucepan or a 6- to 8-quart stockpot. Fill it almost to the top with raw chicken parts and cover with cold water, leaving 2 inches of space at top of saucepan or stockpot. Bring to a boil over medium-high heat and reduce heat so that the liquid simmers steadily. Skim off the brown foam that rises to the top, using a soup skimmer, small tea strainer, or serving spoon. After 5 minutes or so the foam will become white; no more skimming is necessary.

Add the onion, carrots, and celery. Make a bouquet garni by forming a tight bundle of the parsley sprigs (fold the stems in half), bay leaf, and thyme, and then tying it together with kitchen twine. Add to the pot and use a spoon to submerge the bundle. Cover pot loosely and adjust heat so that the liquid just barely simmers. Simmer stock for 4 to 8 hours, adding water if necessary to keep the bones covered.

Remove bones and meat, straining them thorough a colander or strainer set over a large bowl to catch all the juices. Discard all the solids and pour the strained juices into the saucepan or stockpot. Pour the stock through a fine strainer into the large bowl, then back into the pot. Set the pot into a sink filled with ice-cold water, changing water after 10 minutes and again after 20 minutes. When cool, cover and refrigerate for up to 3 days or freeze for later use.

Before using the stock, scrape the congealed fat from the surface using a slotted spoon or a large serving spoon. It can be frozen in a sealed container for up to six months. When freezing stock, fill the container within 1 1/2 inches of the top, allowing headspace for the frozen stock to expand as it freezes. If the stock is needed immediately after it is made, use a gravy strainer or a wide, shallow spoon (held just under the surface) to remove the liquid fat.

Backyard BBQ rub

This big-flavored spice blend is guaranteed to ignite great taste when rubbed on shrimp, scallops, chicken, beef, lamb, buffalo, or pork. This recipe yields about 2 1/2 cups of the spice rub, which is a great quantity to divide and package for gift giving.

YIELD

Makes about 2 1/2 cups of rub, enough to fill three (5- to 6-ounce) spice jars

INGREDIENTS:

1/2 cup kosher or sea salt
1/2 cup packed dark brown sugar
1/3 cup ground cumin
1/4 cup coarsely ground black pepper
1/4 cup sweet paprika
1/4 cup dried thyme, crushed
1/4 cup chili powder
2 tablespoons ground coriander
4 teaspoons ground cinnamon

Prep Time: 20 minutes

Implements
Medium Bowl, Measuring Cups and Spoons, Wooden Spoon, Three Spice Jars or Tins

INSTRUCTIONS:

In a medium bowl, combine the salt, sugar, cumin, pepper, paprika, thyme, chili powder, coriander, and cinnamon. Stir well to blend.
Divide into 3/4-cup portions and transfer to jars or tins with tight-fitting lids.

Storing
Store the spice rub away from heat and light for up to 4 months.

Gift-Giving Tips
Tie each jar or tin with raffia or ribbon and attach a recipe card. To turn this into a gift basket, consider including some smoking chips, alder planks, or decorative metal grilling skewers. To make the gift a bit more elaborate, include a set of grill tools, a grill basket, or even long grill mitts.

Recipe Card
Grilled Pork Tenderloin with Backyard BBQ Rub
Prepare a medium-hot fire in a charcoal or gas grill. Remove 2 pork tenderloins from the refrigerator 30 minutes before grilling. Place on a rimmed baking sheet. Rub on all sides with olive oil and then rub each tenderloin with 2 T. of the rub. Grill, turning to sear all sides, until the pork is cooked through, slightly pink at the center, and registers 145°F on an instant-read thermometer, about 10 minutes. Let it rest for 5 minutes, slice, and serve.